Showing posts with label Disneyland. Show all posts

Sunday, February 23, 2014

Time for Tea

Okay...so in my opening post I said I would be posting layouts where I managed to fit lots of lots of pictures...and this one might just be the Queen Mother of those pages.

The Tea Cups at Disneyland...every time we go over to ride them, the picture taking goes something like this:  I don't ride, because, frankly, at my age I'm not sure I'd come off alive.  Sadly, I just don't do spinning anymore.  So while everyone else rides, I turn my camera on multi-shot and once the ride starts, I pretty much depress the shutter button and start taking pictures.  My intentions are always to "pick the best and delete the rest" but that rarely happens because I'm bad at making choices.  So when all is said and done, I have anywhere from 20-50 pictures.  Out of that scenario, this page was born:


I fit 28 pictures on this page total.  It took a lot of hard thinking to figure out how to do it, but once I had the idea it was pretty easy to carry out.  The paper is just random stuff from my stash--nothing that was coordinated, I just picked paper that matched the really cute Mad Tea Party stickers I was using.  The ribbon buckles and tags are from Scrapworks, and the ribbon is American Crafts.  It was really surprising how easy it was to coordinate all these pieces even when they weren't sold together originally.


 The filmstrip on both pages was cut using my Mickey and Friends cartridge and I have used this particular piece a LOT to make more pictures fit on a page, or to help tell a story with the photos by putting them in order.


In this case, I use pictures that were in consecutive order for the filmstrips, so it would actually replicate what you might see on a filmstrip.  The pictures are small, so you can't see a lot of detail, but because they are action shots, they are super fun and I just couldn't leave them off--you can see hair flying and funny faces--priceless!


In this picture you can kind of see how the pictures look being put in order...if you looked up and down really fast you might be able to see the cups actually spinning.  Okay... not really, but that's kind of the idea.

So if you've counted the pictures, you might have noticed that they aren't adding up to 28.  That's because unless you're looking, you don't see my "secret element" on this page--the spinning wheel.


That blue frame at the top of page two is actually a hole in the page.  See the circular piece at the top?  That's the wheel behind the little frame.  The frame is cut from chipboard to make it sturdier and covered with paper.  Directly behind the hole is a piece of transparency glued to the back of the page.  I put that there so that as the wheel is turned the pictures glued to the wheel wouldn't get caught on the hole.  The journaling block was printed on another transparency and is held onto the front with the same brad that is holding the wheel in place.

Picture #1

Picture #2

The space between pictures... all the pictures are glued on at an angle so when it turns they are upright.
Notice there is a notch at the top of the wheel.  I put notches in between all the pictures so it can be turned a little easier.  All in all there are five pictures on the wheel.  I hooked the wheel on temporarily so I could turn and trace and turn and trace--that's how I figured out where to glue the photos.

Hopefully the explanations are good--this was really a fun technique to use to get a lot of pictures onto this layout.  I'm sure I will need to use it again in the future since I don't know how to delete.


Saturday, February 22, 2014

Life is a HIGHWAY!

Long before Carsland opened, I just loved the movie.  So when Tow Mater and Lightning McQueen showed up at Disneyland for the first time, I definitely knew I had to get some pictures!

 This is a page I put together long before the Cars Cricut cartridge came around.  The Cars characters, logo and tires with skid marks are 3D stickers that I got at JoAnn's.  The paper is just some loose hodge podge paper that I had in my stash.  The ribbon came from Pebbles, Inc.  I love the black ribbon with white stripe down it...it looks like a road!


When I do pages with a theme from a movie I like to include my favorite quotes from the movie.  This really great gem is from an advertising billboard for Rust-eze.


I used these fun quotes from the movie and printed them in Word.  I just added the shapes to my page and then added text.  It's super easy to find movie quotes with a simple online search.


This part of the title was made with a Sizzix alphabet called Rat-A-Tat.  I cut them in black and white and just inserted the white pieces into the circles.


I made the word "highway" with WordArt and a free font I downloaded off the internet.  (Unfortunately my computer crashed since then and I lost all the fonts I had downloaded, so I don't remember the name.)  Since I wanted them in black and I couldn't print on black paper, I flipped it upside down and printed it on white, then glued it on the back of the black paper to cut it out.  Then I used a white pen to add the lines.  Very simple and easy--I really need to get a Silhouette so I can use more of these online fonts.

Since doing this page I have acquired the Cars Cricut cartridge and been to Carsland twice...I really can't wait to get some time to do some more Cars pages!


Friday, February 21, 2014

Ridin the Rails

One of the best rides at Disneyland would be Big Thunder Mountain Railroad! There are so many fun things to see and take pictures of as you wait in line. Our whole family loves this ride, and sometimes are even pretty specific on who they will ride with. In these pictures my son wanted to ride with his Uncle Patrick, and  informed him that they had to scream, but not some lame girly scream, he wanted to scream like men! I was lucky enough to sit in front of them so I got to listen to the low pitched screaming throughout the whole ride! It was so funny and I will never forget it!
I went searching online for an idea for this page and found the perfect idea, so I scraplifted it. I'm not sure where I even saw it now, it has been years, but as soon as I saw the mountains and the railroad track I knew I wanted to that with my page too. The railroad ties are small popscicle sticks, I cut the rounded ends off of the top and bottom using wire cutters. That was a messy project because it shot little wooden pieces all over my kitchen, I was finding them for weeks, then I stained  the fronts and side with acrylic stain. The track is just made out of gray paper, which I cut first then arranged my ties in the pattern to match.
It was tricky glueing this, there was a lot of shifting of railroad ties, and maybe even a little swearing was involved. But once it was done it was so cute! My next step was creating my mountain, which is just a piece of paper that I tore to make it look rugged at the top then chalked with my Pebbles crafting chalk. 

I used plain colored rust cardstock for my background. All the pattern paper is from Rusty Pickle, as well as the sticker sayings and the sticker letters used in my title. For my title I used burlap that I stained using my distressing ink. The blue strip down the center is just a piece of denim and I attached it with metal brackets from We R Memory Keepers. The word "The" is done with scrabble letters. I mounted the sticker letters on black so they would stand out, also because it made them easier to glue to the fabric. The lasso is just made with thin twine.

Because I had so many cute pictures and so many cute embellishments I made a half page to go in the center. You have seen this done on an earlier post, it is such a great idea! I distressed a lot of this page so that it would look  more rugged. and all the metal embellishments you see are We R Memory Keepers.  
This page was fun! It took a long time to do it, but was so worth it when I was done! 


Thursday, February 20, 2014

California!

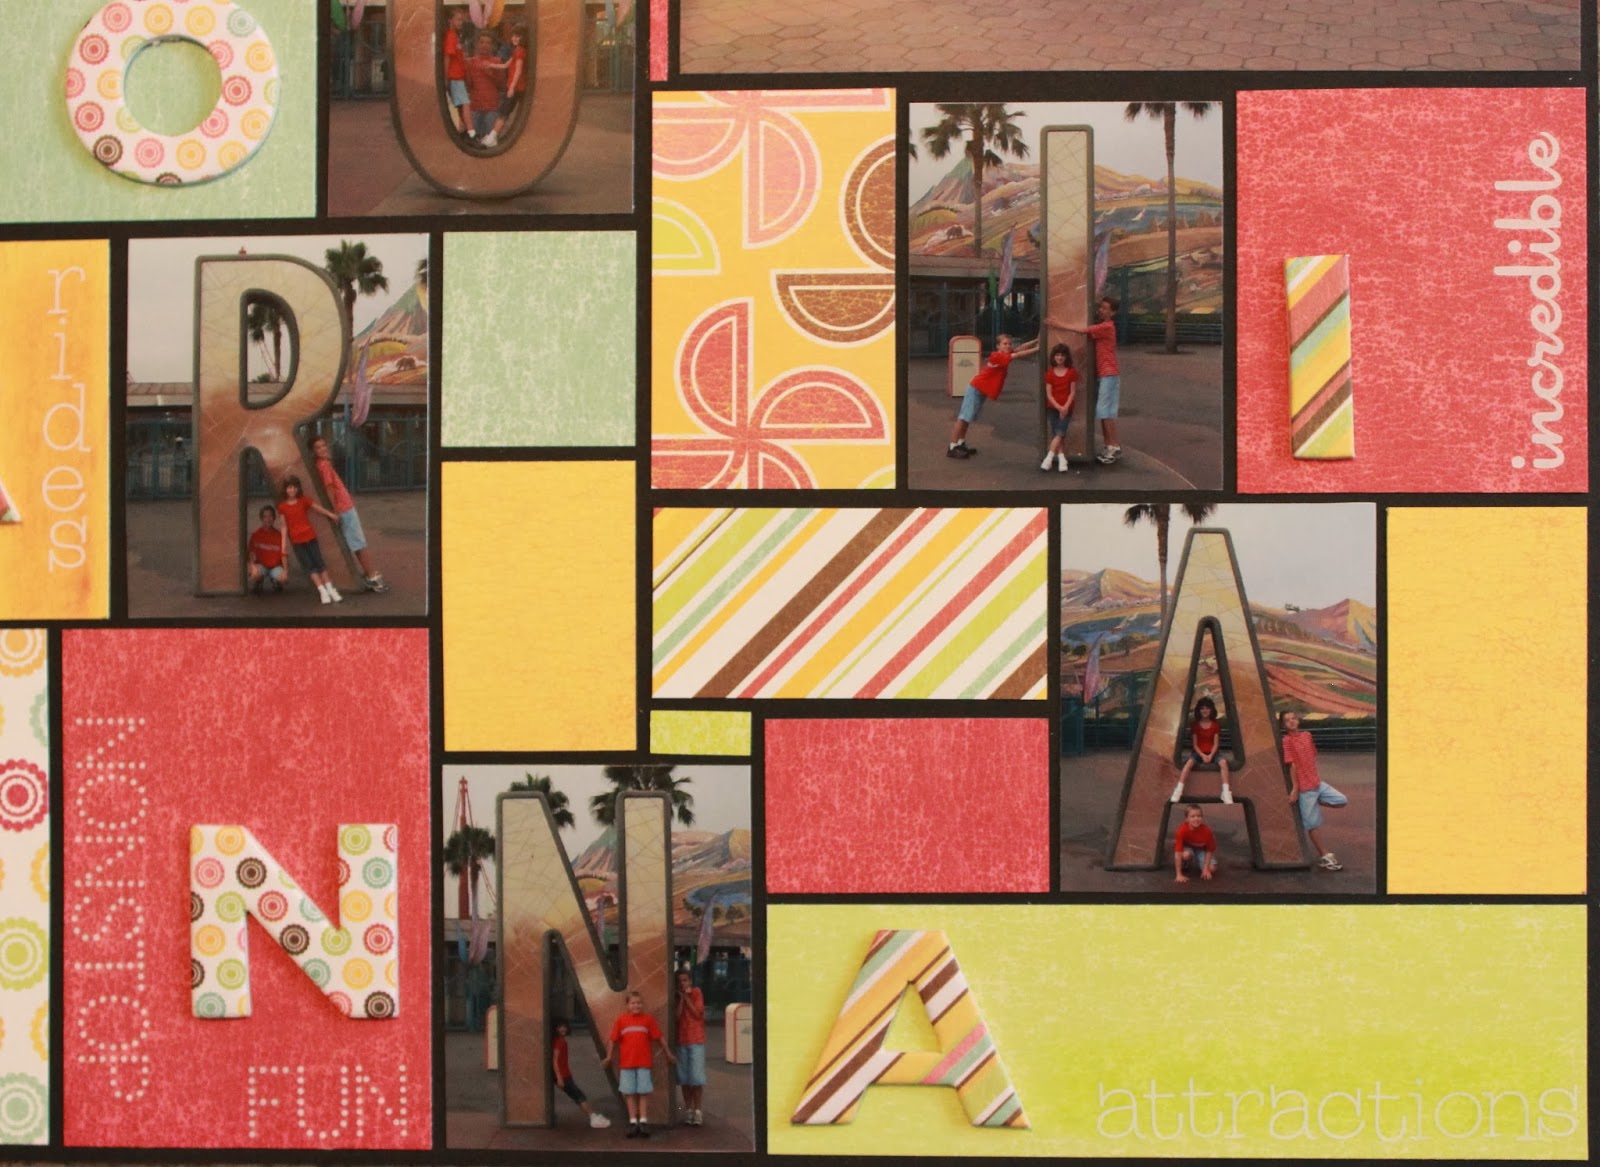
 I really love they way they have updated the California Adventures park these days--it feels much more like an actual Disney park now than it used to.  But back when they had the huge letters that spelled California, we used to have quite a bit of fun with them.

One morning as we waited for the park to open, we decided to get some fun pictures in the letters.  I believe these pictures were taken just about a year before they removed them.  I had the kids pose in or around each letter and snapped away!  The pictures turned out really cute and presented me with the problem of fitting them all on one layout (I couldn't very well have a page that stopped short of spelling the whole word...)

 
The paper, ribbon and chipboard letters I used are all from We R Memory Keepers--the Diner collection.  I love We R Memory Keepers coordinating stuff--the colors are great and this particular collection's colors really worked with the photos.


My sister used Adobe Photoshop Elements to stitch two pictures into one panoramic shot of the whole word.

 I used the big chipboard letters to spell out the word "California" and a bunch of various white rub on letters to add a word that started with each letter to the block it was in--preferably something that had something to do with our trip.  For some of the lighter colored blocks I chalked some darker color onto the paper before adding letters so it would show up a little better.

I put the letters in proximity to the picture with the same letter.  Luckily since the park wasn't open yet I didn't get any guff from the kids about taking all the pictures--they were nice and cooperative, even enjoying trying to figure out how to pose differently for each letter.

I had seen many pages with this color blocking idea and just loved it.  It allowed me to make the page colorful, use lots of different patterns of paper (although just small pieces of each, so I didn't really use that much paper when all was said and done) and I was able to fit a LOT of pictures on one layout.

I especially love this page now that all those letters have been taken down.  It's fun to see the differences in the parks over the years and my kids have been lucky enough to get to grow up and experience each new thing as it came along.  Have I mentioned that I really love Disneyland lately?


Friday, February 14, 2014

I Love Toontown!

I have to give credit where credit is due, and say that this page was my sister Lori's idea, and it was a good one!  To understand the concept, you have to not only be familiar with Toontown at Disneyland but also Toontown the online game (that has now, sadly, disappeared).

Our kids were all Toontown Online players, and (confession time...) I must admit that so was I...sometimes until late into the night.  All of us absolutely loved the game, and if you never got a chance to play or watch your kids play, you can't possibly understand just how precious it was. For those that aren't familiar, basically you would take on the roll of a little cute animal that makes little cute animal noises and runs around Toontown defeating "cogs" by using gags on them, like throwing a pie, squirting them with flowers, or dropping a safe on them.  If the cogs defeat you, you don't die...you get sad.

After starting to play the game, every time I went to Toontown at Disneyland it's all I could see.  So as the kids were running around being silly and we were taking pictures, story lines involving the online game continued to come to mind.  At first we were thinking something like a comic strip, and when we printed the pictures we added balloons with words to many of the pictures that created a story.  And then this page was born...again, thanks to my sister.  A newspaper!


This page was so much fun to create because it was completely different from anything I've ever done!  I am not a digital scrapbooker at all, but all of it was done on the computer and printed out.  The little pictures in the body of the newspaper are all screenshots from the game itself and the pictures of individual toons are our kids' characters.  If you'll notice the little picture of the toons with hunched shoulders just under the title--that's what you look like when you're sad...and that is my favorite of all the little pictures we got from the game.


These little tags have "eyewitness accounts", just like a newspaper might have.  The three characters quoted are our girls' characters.  It was fun to come up with puns that played right into the game and it's great elements.

The best thing about this page to me now, is not only did I preserve the great fun we had at Disneyland, but I was also able to capture the enormous (and years' worth) of fun we had playing the game online--which is especially important now that the game is gone.  Goodybye, Little Bubbles Bumpenmuddle, I will miss you!

Monday, February 10, 2014

Get Ready for the Yeti!

I do a lot of Disneyland scrapping... I dare say it's my favorite.  We go every single year and I usually take in excess of 400 pictures (just ask my kids how annoying it is...).  My new favorite thing to say at Disneyland is "the faster you shut up and smile the quicker we can move along"...followed closely by "this is the happiest place on earth, paste a smile on your face right now and act like it!".  In reality, my kids absolutely love Disneyland and they have learned after all these years that there's no getting out of the photos no matter how bad they fight me.

The Matterhorn is a hard ride to take photos of, and it's also hard to scrapbook.  There is an awful lot of Disney stuff available for purchase, but I have yet to find embellishments meant for the Matterhorn.  So this page sent me in search of a yeti I could paper piece by hand.


I love, love, love this paper from Scenic Paper Route and I am very sad that they are no longer around.  The colors couldn't have matched the ride better if I'd manufactured them myself.  The blue snowflake ribbon came from American Crafts and matches the paper to a "T".  The white letters are from Adorn It and the snowflakes and tags are all from Making Memories.

I almost always put my pages on plain colored cardstock.  Not only is it cheaper than most patterned paper, it's going to be almost completely covered by stuff by the time I'm done.  There is no such thing as too much plain cardstock and you can't possibly ever think you have every color, because most assuredly whatever color you're looking for you won't have.  Unfortunately, it's one of those unwritten laws of the universe.

I love clear stickers, but I hate trying to make them work on a page by themselves because whatever you put them on, they get lost.  I like to use tags or other embellishments to make them stand out better.  These snowflake tags are hanging from the top of the page, almost like they're falling.  I've had the stickers for a long time, so it was fun to get to make use of them.  Besides the stickers I also had some snowflake buttons.  I cut the shank from the back and glued them on their own tag too.

But definitely the best part of this page is the yeti.  I love him!  I found this picture with a google image search and just knew he was definitely the one.  I made his fur out of fuzzy paper (I don't know who even makes this paper, but every time I find it anywhere, I buy up as much as I can--I love it and use it often!)  It is fuzzy on one side, a little like felt, only softer, and the backing is just plain paper.  I have also found fuzzy paper that is sticky-backed but I actually don't like it as well as the plain stuff.  I recommend picking some up if you ever see it.  All his other parts are just plain cardstock.  In a future post I will talk about how I paper piece these little guys by hand.  It isn't hard at all, but it takes some time.

I cut a hole for his mouth and glued the mouth and teeth behind him instead of on top to give it a little bit of proper dimension.  In this close up you can better see his fuzzy face.  I loved working on this page!  And I really love making these paper pieced items by hand--they usually turn out really cute and they are truly unique.  I can almost hear him growling...


Saturday, February 8, 2014

Toy Story Mania!

One of my favorite rides at Disneyland turned into one of my favorite scrapbook layouts ever!  Being a lover of all the Toy Story movies, naturally I had to run right out and buy the Toy Story Cricut cartridge.  It's been one of my best purchases--could these toys be any cuter?


So here's the rundown of the supplies I used for this page:
  • The patterned paper with primary colors and the punch outs came from a Storyteller's Club pack called "Play" (appropriately).
  • The yellow background paper is from Three Bugs in a Rug.
  • All the little Toy Story characters and the title are from the Toy Story cartridge.
  • The letters for the word "mania" came from the Mini Monograms cartridge (and the little blocks behind them are handmade.)
  • The shooting gallery ducks are from the Everyday Paper Dolls cartridge.
  • The "midway" letters are some little wooden scrabble stickers I had hanging around.  Unfortunately I don't remember where they came from, but I love them and wish I could get my hands on some more of them.
  • The wavy lines I cut using Kiwi Lane Designs templates.  Very awesome when you're not quite sure what to do with your patterned paper.

This title idea I scraplifted from a digital page I found on the web somewhere, although it's not exactly the same.  I'm not a digital scrapbooker, so I had to figure out how to make it work with paper.  The little army guys are so amazingly cute but a little hard to cut (because I made them small).  After screwing them up a few times and resigning myself that a new blade was required, they finally cut nicely.  I love them!  


The shooting gallery ducks are by far the crowning achievement on this page (okay...maybe not.  It might be the army men.  Some harsh words were uttered in the making of the army men).  I knew they would be hard, especially with their little targets on them, but they turned out so cute with little google eyes!  They are just glued on thin black strips of cardstock.


What's a Toy Story page without the aliens?  They are my favorite!  Since the aliens were pointing up, I felt it appropriate that they actually point at something.  Cute little adorable aliens.  They're so precious.  Trip to Disneyland, anyone?