Friday, February 28, 2014

My Thinker


Little could I have known way back when these pictures were taken and I scrapbooked this layout just how prophetic they would be about my sweet son.  I was not present when the photos were taken, my husband took them while the two of them were up in the mountains hiking, but when I saw them I instantly fell in love with them.  I'm not quite sure I've ever seen pictures that summed up his personality so well!  He's been a deep thinker his whole life, and now that he's almost 20 years old, I realize how well all that thinking has served him.

I could possibly alternately title this page: "You just never know when those weird things you bought are gonna come in handy".   All the patterned paper on this page was bought at this little off-the-beaten-path scrapbook store.  They were selling these packs of paper that were nothing but strips--approximately 4 inches wide--there were about 100 strips per pack, and I momentarily thought "What will I do with 100 strips of the same patterned paper...and when will I need just four inches of it?"  But they were only about a dollar per pack, so I bought them anyway--lots of them in all different colors and patterns.  Then I tossed them in a drawer and they never made an appearance again until this page came along.  The piece under the title needed to be a little wider, so I just lined up a couple of strips and glued them on together.


The word "thinker" is another word I made using WordArt.  I flipped it and printed it on the back of one of the strips, then cut it out with my precision scissors and craft knife.  The other letters are metal tags that I bought in a plastic bag from the same store--no name brand on them or anything.


One of my all-time favorite elements to include on a layout is poetry.  Maybe it's the English major buried deep inside me, but I just think poetry expresses feelings that can't be expressed any other way.  Sometimes I write my own poems, but they are usually cutesy or funny and always rhyming.  I love this one to go with this page, and I'm not even sure how I found it...but it must have been some kind of miracle.

If you haven't ever created a page like this, I challenge you to do it, and I'm not talking about the layout--I'm talking about capturing a child's soul in photos and preserving it so succinctly that fifteen years down the road you can look back at it and remember that moment when you discovered exactly who they are.  


Thursday, February 27, 2014

Arctic Zone

I've been trying not to post just vacation pictures on here, but there are just so many fun themed pages from a vacation, that here I am posting yet another one! This is the Wild Arctic at Seaworld!  We got to experience a simulated helicopter ride over frozen tundra, when we disembarked there was a realistic Arctic research station. We saw, polar bears, whales, walruses and an ice tunnel, complete with the growling of polar bears! There were so many cute set ups to take pictures it was really hard to narrow it down to just a few pictures for my page, so I actually broke these pictures down into two different layouts. Here is the first.
I used Three Bugs in a Rug paper. This was actually a packet that came with sticker letters and a sticker sheet. I used the letters from the kit to spell "arctic" and the word "adventure" is done with rub ons. I mounted the skull sticker on the top of the page onto a metal tag. The frame on the bottom is a plastic expressions frame from Heidi Grace. I  used some of my thin twine along the bottom, I just wound a couple layers to make it look like a coiled rope.
I had much more fun creating the second page of this layout!!!
I used more of the words from the sticker sheet which I  mounted on more metal tags along the top of the page, you can get these tags at walmart, they are just sale tags you use to price things at a garage sale. I just added some odds and ends buttons I had that matched. The real fun came in making my crates at the bottom!
These are made out of chipboard. I cut squares out of chipboard then I cut thin strips out of chipboard  to boarder the squares to make them look more like boxes. I had some pattern paper that looked like wood so that's what I used to cover the chipboard. I printed the labels on transparency, so that I wouldn't have any glue showing I made the transparency squares big enough to glue under the boarders. Once they were all glued I used my walnut distressing ink to make them look worn and again wound up more twine for the coiled rope. I had to put a couple of the crates on pop dots to make them look stacked. Super fun to make!


Wednesday, February 26, 2014

Dinosaurs!


Back when the kids were little, we spent some time in St. George and went to the Dinosaur Discovery. Considering all kids have some kind of fascination with dinosaurs at some point, they loved seeing the actual fossils even if they didn't have giant life-sized replicas.


This was a GREAT chance to use my Cricut Dinosaur Tracks cartridge.  I am sorry to say that this cartridge is retired now...not sure why because it is very cute and original.  While other carts have dinosaurs on them, none are quite as good as these.

The paper I used is from Crate Paper--it was a fabulous coordinating set that I got at the Scrapbook USA Expo a couple of years ago.  I don't know if Crate Paper is still around, but I sure have a lot of their stuff and it's all cute.


These letters for the title are stickers that came with the pack.  They have a bit of a textured look--kind of fuzzy (but they aren't).  I love that the kit came with a lot of letters--too many times I don't have what I need and can't use my stickers, so I tend to buy multiple sheets when I get them.


These fossils are part of the Dinosaur Tracks cartridge and they were super fun to make!  I was actually very impressed with how well my Cricut did cutting these out because they were very intricate.


Since the page was pretty full with all the dinosaurs I made, I had to create a place for journaling to go. The picture on the top of the page is actually a pocket, and the green piece behind it with a tab can be slid out.  Guess what I discovered when I pulled this page out to get some pictures?  Yep...someone forgot to do their journaling.  Oops.

So that's my page for the day.  If there is a particular theme of layout you'd like to see, please let us know in the comments section and we'll see what we can come up with!


Tuesday, February 25, 2014

Zions

It's always hard for me to do nature pages. I always am more productive when I scrapbook if I have a theme, nature just isn't specific enough for me. This page however came together really fast and was easy! Thanks to Crate Paper!

Crate Paper has the cutest packets! I have had this one for a long time and just didn't know what pictures to put with it. This pack came with the pattern paper, sticker letters and numbers, glitter dies, and glitter stickers. 
I used my kiwi lane templates to make the waves at the bottom, and again I used my walnut distressing ink to make it look worn. I used my circle cutter to make the circle at the top of the page. The jewel brads are from a QVC pack my sister got me at the convention a long time ago. My title is made using foam letters from Adorn it, they have the cutest letters I always stock up when we go to the Expo. I used the sticker letters from the pack to spell the words "national park" 
I put almost all of my die cuts on pop dots to give the page some dimension. There you have it! Another easy page!!! Have fun Scrapping!!


Monday, February 24, 2014

M&M World

The m&m outlet in Las Vegas is a really fun place to visit. They have all sorts of things to buy and you can watch a 3D movie starring the m&ms. A great place to visit, and don't forget to pick up some chocolate while you're there!


There aren't any m&m embellishments to buy, so for this page I had to create my own. My background is just plain black cardstock and I used pattern paper from a Die Cuts paper pad, again, can't remember the name of it. 


I went online and found the m&m characters sized them to fit my page and traced and paper pieced them. They were a lot of fun to do, other than the eyebrows they were pretty easy, I found myself misplacing the eyebrows a lot and did a lot of searching! I did the same thing with my title. I did the word 
"world" with button letters from Doodlebug Designs. 
I made my m&m's using a circle punch and cut "m"s out with my cuttlebug. I made this little cluster and also a border running down the side of the page.
I recommend eating m&m's while working on a page like this, it really does help with your inspiration, but when isn't chocolate inspirational?


Sunday, February 23, 2014

Time for Tea

Okay...so in my opening post I said I would be posting layouts where I managed to fit lots of lots of pictures...and this one might just be the Queen Mother of those pages.

The Tea Cups at Disneyland...every time we go over to ride them, the picture taking goes something like this:  I don't ride, because, frankly, at my age I'm not sure I'd come off alive.  Sadly, I just don't do spinning anymore.  So while everyone else rides, I turn my camera on multi-shot and once the ride starts, I pretty much depress the shutter button and start taking pictures.  My intentions are always to "pick the best and delete the rest" but that rarely happens because I'm bad at making choices.  So when all is said and done, I have anywhere from 20-50 pictures.  Out of that scenario, this page was born:


I fit 28 pictures on this page total.  It took a lot of hard thinking to figure out how to do it, but once I had the idea it was pretty easy to carry out.  The paper is just random stuff from my stash--nothing that was coordinated, I just picked paper that matched the really cute Mad Tea Party stickers I was using.  The ribbon buckles and tags are from Scrapworks, and the ribbon is American Crafts.  It was really surprising how easy it was to coordinate all these pieces even when they weren't sold together originally.


 The filmstrip on both pages was cut using my Mickey and Friends cartridge and I have used this particular piece a LOT to make more pictures fit on a page, or to help tell a story with the photos by putting them in order.


In this case, I use pictures that were in consecutive order for the filmstrips, so it would actually replicate what you might see on a filmstrip.  The pictures are small, so you can't see a lot of detail, but because they are action shots, they are super fun and I just couldn't leave them off--you can see hair flying and funny faces--priceless!


In this picture you can kind of see how the pictures look being put in order...if you looked up and down really fast you might be able to see the cups actually spinning.  Okay... not really, but that's kind of the idea.

So if you've counted the pictures, you might have noticed that they aren't adding up to 28.  That's because unless you're looking, you don't see my "secret element" on this page--the spinning wheel.


That blue frame at the top of page two is actually a hole in the page.  See the circular piece at the top?  That's the wheel behind the little frame.  The frame is cut from chipboard to make it sturdier and covered with paper.  Directly behind the hole is a piece of transparency glued to the back of the page.  I put that there so that as the wheel is turned the pictures glued to the wheel wouldn't get caught on the hole.  The journaling block was printed on another transparency and is held onto the front with the same brad that is holding the wheel in place.

Picture #1

Picture #2

The space between pictures... all the pictures are glued on at an angle so when it turns they are upright.
Notice there is a notch at the top of the wheel.  I put notches in between all the pictures so it can be turned a little easier.  All in all there are five pictures on the wheel.  I hooked the wheel on temporarily so I could turn and trace and turn and trace--that's how I figured out where to glue the photos.

Hopefully the explanations are good--this was really a fun technique to use to get a lot of pictures onto this layout.  I'm sure I will need to use it again in the future since I don't know how to delete.


Saturday, February 22, 2014

Life is a HIGHWAY!

Long before Carsland opened, I just loved the movie.  So when Tow Mater and Lightning McQueen showed up at Disneyland for the first time, I definitely knew I had to get some pictures!

 This is a page I put together long before the Cars Cricut cartridge came around.  The Cars characters, logo and tires with skid marks are 3D stickers that I got at JoAnn's.  The paper is just some loose hodge podge paper that I had in my stash.  The ribbon came from Pebbles, Inc.  I love the black ribbon with white stripe down it...it looks like a road!


When I do pages with a theme from a movie I like to include my favorite quotes from the movie.  This really great gem is from an advertising billboard for Rust-eze.


I used these fun quotes from the movie and printed them in Word.  I just added the shapes to my page and then added text.  It's super easy to find movie quotes with a simple online search.


This part of the title was made with a Sizzix alphabet called Rat-A-Tat.  I cut them in black and white and just inserted the white pieces into the circles.


I made the word "highway" with WordArt and a free font I downloaded off the internet.  (Unfortunately my computer crashed since then and I lost all the fonts I had downloaded, so I don't remember the name.)  Since I wanted them in black and I couldn't print on black paper, I flipped it upside down and printed it on white, then glued it on the back of the black paper to cut it out.  Then I used a white pen to add the lines.  Very simple and easy--I really need to get a Silhouette so I can use more of these online fonts.

Since doing this page I have acquired the Cars Cricut cartridge and been to Carsland twice...I really can't wait to get some time to do some more Cars pages!


Friday, February 21, 2014

Ridin the Rails

One of the best rides at Disneyland would be Big Thunder Mountain Railroad! There are so many fun things to see and take pictures of as you wait in line. Our whole family loves this ride, and sometimes are even pretty specific on who they will ride with. In these pictures my son wanted to ride with his Uncle Patrick, and  informed him that they had to scream, but not some lame girly scream, he wanted to scream like men! I was lucky enough to sit in front of them so I got to listen to the low pitched screaming throughout the whole ride! It was so funny and I will never forget it!
I went searching online for an idea for this page and found the perfect idea, so I scraplifted it. I'm not sure where I even saw it now, it has been years, but as soon as I saw the mountains and the railroad track I knew I wanted to that with my page too. The railroad ties are small popscicle sticks, I cut the rounded ends off of the top and bottom using wire cutters. That was a messy project because it shot little wooden pieces all over my kitchen, I was finding them for weeks, then I stained  the fronts and side with acrylic stain. The track is just made out of gray paper, which I cut first then arranged my ties in the pattern to match.
It was tricky glueing this, there was a lot of shifting of railroad ties, and maybe even a little swearing was involved. But once it was done it was so cute! My next step was creating my mountain, which is just a piece of paper that I tore to make it look rugged at the top then chalked with my Pebbles crafting chalk. 

I used plain colored rust cardstock for my background. All the pattern paper is from Rusty Pickle, as well as the sticker sayings and the sticker letters used in my title. For my title I used burlap that I stained using my distressing ink. The blue strip down the center is just a piece of denim and I attached it with metal brackets from We R Memory Keepers. The word "The" is done with scrabble letters. I mounted the sticker letters on black so they would stand out, also because it made them easier to glue to the fabric. The lasso is just made with thin twine.

Because I had so many cute pictures and so many cute embellishments I made a half page to go in the center. You have seen this done on an earlier post, it is such a great idea! I distressed a lot of this page so that it would look  more rugged. and all the metal embellishments you see are We R Memory Keepers.  
This page was fun! It took a long time to do it, but was so worth it when I was done! 


Thursday, February 20, 2014

California!

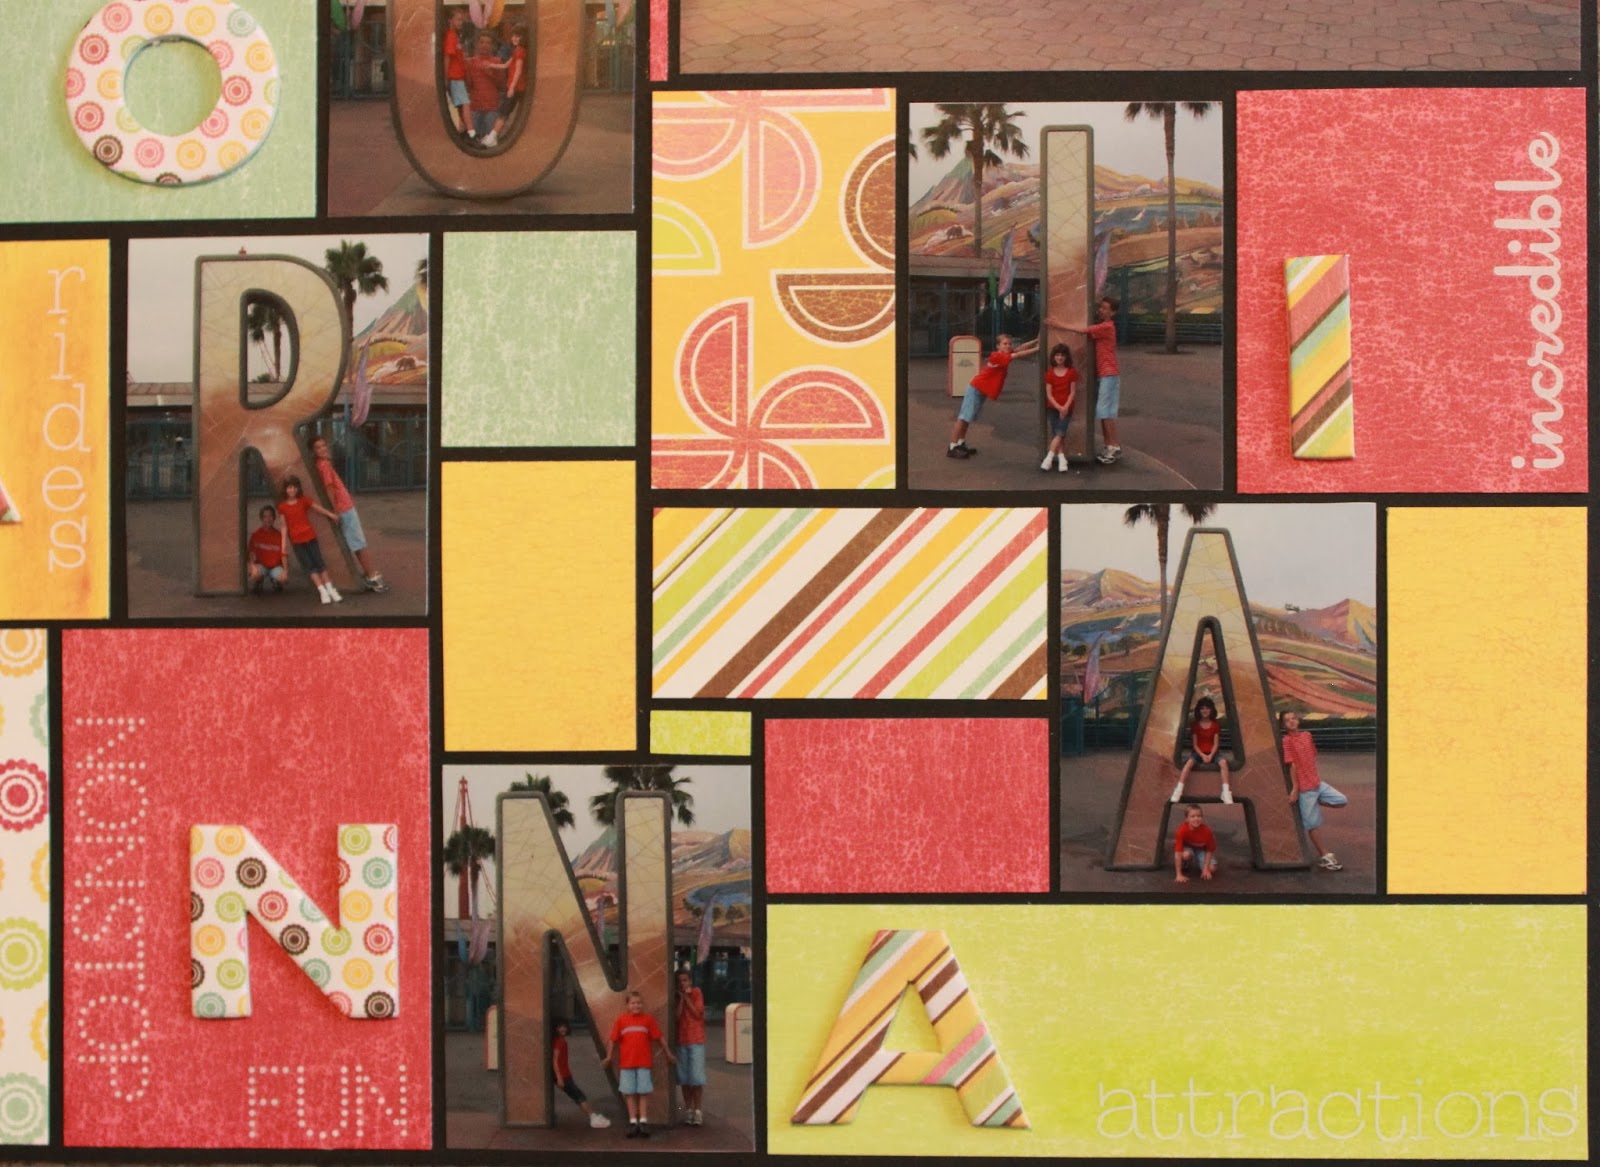
 I really love they way they have updated the California Adventures park these days--it feels much more like an actual Disney park now than it used to.  But back when they had the huge letters that spelled California, we used to have quite a bit of fun with them.

One morning as we waited for the park to open, we decided to get some fun pictures in the letters.  I believe these pictures were taken just about a year before they removed them.  I had the kids pose in or around each letter and snapped away!  The pictures turned out really cute and presented me with the problem of fitting them all on one layout (I couldn't very well have a page that stopped short of spelling the whole word...)

 
The paper, ribbon and chipboard letters I used are all from We R Memory Keepers--the Diner collection.  I love We R Memory Keepers coordinating stuff--the colors are great and this particular collection's colors really worked with the photos.


My sister used Adobe Photoshop Elements to stitch two pictures into one panoramic shot of the whole word.

 I used the big chipboard letters to spell out the word "California" and a bunch of various white rub on letters to add a word that started with each letter to the block it was in--preferably something that had something to do with our trip.  For some of the lighter colored blocks I chalked some darker color onto the paper before adding letters so it would show up a little better.

I put the letters in proximity to the picture with the same letter.  Luckily since the park wasn't open yet I didn't get any guff from the kids about taking all the pictures--they were nice and cooperative, even enjoying trying to figure out how to pose differently for each letter.

I had seen many pages with this color blocking idea and just loved it.  It allowed me to make the page colorful, use lots of different patterns of paper (although just small pieces of each, so I didn't really use that much paper when all was said and done) and I was able to fit a LOT of pictures on one layout.

I especially love this page now that all those letters have been taken down.  It's fun to see the differences in the parks over the years and my kids have been lucky enough to get to grow up and experience each new thing as it came along.  Have I mentioned that I really love Disneyland lately?


Wednesday, February 19, 2014

Family

For a long time I had a hard time getting family pictures taken. Mostly because of the expense, but my mom got a new camera and was willing to take the pictures for us, that made it a lot easier on the wallet! Now that the kids are older it's even harder because we can't get everyone together, let alone coordinate clothes, because everyone knows that is a must if you're going to have a family picture taken! This was one of our funnest family photo shoots! I only have one regret! Bryan and I should have gotten in there and jumped in the air with our kids! Although I'm not sure jumping like that is a good idea for me, not quite sure if I would land on my feet!
This page is done with a storytellers club pack! I just love them! We used to get the greatest deals at the scrapbook expo, but they haven't been there in awhile. I also have to give credit to my mom for helping me with the layout! I knew I wanted to scrapbook the pictures and knew what storytellers pack I wanted to use, but was not coming up with any ideas on how to lay it out. She is really good at putting pages together and all of her pages are cute! I used Kiwi Lane templates. The pattern paper is from Three bugs in a Rug. I love love love their paper! I have almost one full paper box with just Three Bugs paper in it.

I inked the edges of everything and added a few buttons and brads. Easy Peasy! Best thing about storytellers is that it has everything you need in it, borders, sayings, punch outs!  
Favorite picture on the page? The picture in the corner, with my son pouting I think it's so funny! Mostly because it is a fake pout! I have so much fun with my boys, they make me laugh everyday! 
Super fun pictures and a super fun and easy layout!